 Dancier
Setting up your own Nextcloud with Collabora Office
Author: Marc Gorzala
This post explains how you could setup your own Nextcloud with Collabora Office having SSL automatically managed via Letsencrypt and Traefik.
What is Nextcloud?
Nextcloud offers a service like DropBox:
You can have you files synced between different devices like your desktop/laptop and mobile. Additionally, you have also a calendar, a todo-list, your contacts and many other things synced across your devices.
What is Collabora?
Collabora, offers you the functionality of Libre Office in your browser. In this tutorial we will integrate Collabora into your Nextcloud installation, so that you can edit office documents directly in your Nextcloud!
The installed system will…
-
… use HTTPS to secure the communication with Nextcloud.
-
… include the Office Suite Collabora Office.
-
… separate Code/App from your data, making it easy for you to
-
make backups.
-
perform updates.
-
-
… work behind a (DSL) router as well as on any other server in the cloud or elsewhere.
Ready to go? Great!
1. Prerequisites
-
A server that is able to run Linux (this post will assume you are using a Debian/Ubuntu based distribution).
-
You have control over DNS entries for a domain that you own. In this tutorial I will assume that you will use Subdomains under
dancier.net:-
cloud.dancier.net- pointing to your future Nextcloud installation -
collabora.dancier.net- pointing to the installation of the office suite. (If you do not want to install the option for editing office files, you do not need this of course)NoteWe are installing everything on one machine. So both domain names point to only one IP-address.
-
2. Used technologies
-
Docker for easy installation/updating of the needed software.
-
Docker Compose for a convenient configuration of the docker containers.
-
Traefik for automatically maintaining SSL Certificates and forwarding requests to either Nextcloud or Collabora Online. In this way it acts as a Reverse Proxy.
-
MySQL to be used as the database for Nextcloud.
-
Collabora Office for the office functionality.
3. Architectural Overview

Figure 1. architectural overview
Let me short describe you this architecture briefly.
-
The
userthat is connects to Nextcloud. -
He is using a
browser(or any other device/app) to make a connection -
The
browserconnects to thewlan_routerat your home. This is your only component with a public IP-address. Thewlan_routeris configured to forward every traffic that it receives on its public IP-address on Port 443 (the HTTPS port) to the IP-address of your local machine that will host your Nextcloud installation on Port 443 (to thereverse_proxy).NoteIf you are installing Nextcloud on a server that is directly connected to the internet, then this component does not exist, and the browser directly connects to the reverse_proxy.
In this case you of course also need not to configure the mentioned port forwarding. -
The
reverse_proxyis receiving the incoming traffic. It will inspect the request to find out to which host it should forward the request to. -
The
nextcloudnode contains just what the name implies. The main program. -
The
dbnode is the database that is used bynextcloudto store everything but your files (contacts, calendar, …) -
collaboracontains the office suite.
Everything that is depicted in the cloud docker will be installed on one (docker-)host.
4. Setting it up
First of all, we will make sure traffic to our planned domains cloud.dancier.net
and collabora.dancier.net could reach our system.
4.1. Check your DNS/IP configuration
All incoming traffic has to reach the reverse_proxy. So the DNS entry should normally
point to the machine you are going to install the system.
|
Tip
|
In case you are installing the system on a host behind a wlan-router
(as depicted in aboves architecture diagram)
you have to find out the public IP-address of the router. Use
this IP-address to configure your DNS entries and forward all traffic
that reaches your wlan-router on PORT 443 to the machine in your
local network where you are going to install Nextcloud.
Just google for <router brand/type> and "port forwarding" how to do this. |
Assuming the public IP-address is 5.61.144.190 you should get
the following responses when invoking a nslookup on the domain names:
marc@marc-VirtualBox:~/programm/dancier/documentation$ nslookup cloud.dancier.net
Server:   127.0.0.53
Address:  127.0.0.53#53

Non-authoritative answer:
Name:	 cloud.dancier.net
Address: 5.61.144.190

marc@marc-VirtualBox:~/programm/dancier/documentation$ nslookup collabora.dancier.net
Server:   127.0.0.53
Address:  127.0.0.53#53

Non-authoritative answer:
Name:	 collabora.dancier.net
Address: 5.61.144.190
4.2. Installing basic tools
You need the following tools on the server you are going to install Nextcloud.
-
docker
-
docker-compose
-
git
-
vim (not necessarily needed, but good to have ;-) )
You can install these tools on your own, or you can download my script and execute it on a freshly installed Ubuntu-Host that should serve the Nextcloud installation. This script installs all the needed tools and clones the project-repository containing the whole setup for Nextcloud.
The next section will assume the script has been run successfully or at least you have performed the equivalent steps manually.
Get the script here:
Copy this script to your server (or download it from there) and execute it with root-permissions.
|
Note
|
If this script will not run on your system, it could give you hints how to install the tools. Just do manually what the script would do for you on a compatible system ;-) |
4.3. Inspecting the project
Check the cloned project in: /root/nextcloud/:
root@cloud:~/nextcloud# ls -la
total 48
drwxr-xr-x 4 root root 4096 Mar 20 14:28 .
drwx------ 6 root root 4096 Mar 20 14:28 ..
-rwxr-xr-x 1 root root 1113 Mar 20 14:28 bootstrap-os.sh
-rw-r--r-- 1 root root 2379 Mar 20 14:28 docker-compose.yml
-rwxr-xr-x 1 root root  119 Mar 20 14:28 .env-template
drwxr-xr-x 8 root root 4096 Mar 20 14:28 .git
-rw-r--r-- 1 root root   86 Mar 20 14:28 .gitignore
-rwxr-xr-x 1 root root 3250 Mar 20 14:28 maintenance.sh
-rw-r--r-- 1 root root 5708 Mar 20 14:28 README.adoc
Brief description of the files:
-
bootstrap-os.sh the script that you maybe already used to install basic tools for this project
-
docker-compose.yml configures all the containers that we use and how they work together
-
.env-template template for the config file that configures mostly everything
-
.git and .gitignore git internal, you can ignore them
-
maintenance.sh the script for doing a backup and update (not yet complete)
-
README.adoc very short explanation how to use this project
You will configure almost everything with .env-template, so we will start with have a short look
into this file.
I think you really need to understand what you are going to install. Latest in case, when something goes wrong, it is better to not start trying to understand the system, just then.
If you are really impatient you can try to skip directly over to section Configuring the system. In this case I wish you a good luck. Consider at least coming back to the more detailed explanations later.
4.3.1. The main configuration-file .env-template
This file contains variables that will be used in other scripts. So you need to declare them only in one central file.
To get an idea, see one example content of such a file. It is not needed that you understand all the variables just now. They will be explained in later sections. It is enough for you to briefly have a look on them and know that:
-
a line starting with a
#introduces a comment, so will not be used by other scripts -
a variable definition is of the following format <variable-name>=<value>
#### Traefik
TRAEFIK_IMAGES=traefik:v2.2
TRAEFIK_LOG_LEVEL=DEBUG

#### Letsencrypt
# Needed for getting ssl-certificates
ACME_MAIL=yourmail@address.de
# Stores the ssl-certificates
VOLUMES_LETSENCRYPT=./letsencrypt

#### Nextcloud
NEXTCLOUD_IMAGE=nextcloud
NEXTCLOUD_ADMIN_USER=test
NEXTCLOUD_ADMIN_PASSWORD=secrect
NEXTCLOUD_VOLUMES_CORE=./nextcloud-core
NEXTCLOUD_VOLUMES_APPS=./nextcloud-apps
NEXTCLOUD_VOLUMES_DATA=./nextcloud-data/
NEXTCLOUD_VOLUMES_CONFIG=./nextcloud-config
NEXTCLOUD_HOSTNAME=cloud.dancier.net
NEXTCLOUD_TRUSTED_DOMAINS=cloud.dancier.net

#### MySQL
MYSQL_IMAGE=mariadb:latest

MYSQL_VOLUMES=./nextcloud-mysql

MYSQL_ROOT_PASSWORD=<your-my-sql-root-passwort>
MYSQL_PASSWORD=<the password for accessing the database for nextcloud>

#### Collabora
COLLABORA_IMAGE=collabora/code
COLLABORA_DOMAIN=cloud\\.dancier\\.net
COLLABORA_HOST=collabora.dancier.net
4.3.2. Composing your services with docker-compose.yml
You need some knowledge of, how docker-compose works, to not break things unintentionally.
First of all be aware that name of the folder that contains the docker-compose file is important.
Docker-compose will use the name of this folder to create things like networks and others for you.
If you have cloned the project like I told you, this name is nextcloud.
So, names of created networks and containers will start with this name. So better do not change the name of this folder!
In general, you can think of docker-compose as a way to configure different services that should act together to fulfill a certain use case. In this case it is, having a full featured Nextcloud installation with an office suite running.
The different services in our case are:
- Traefik
-
that acts as the reverse proxy, forwarding incoming requests to the different internal systems
- Nextcloud
-
that is our main component
- Mysql database
-
that stores all the data for and is used by the Nextcloud service
- Collabora
-
the service used to provide the office suite
So already four services!
Those services will communicate with each other as shown in figure 1. The service-to-service communication happens via a private network that docker-compose will create for you. With this private network, this communication between these services is shielded from the rest of the docker-host (and with this also from the internet).
So let’s see how these four services are configured:
|
Note
|
The compose-file is being written in Yaml-Syntax. This is becoming someway standard for more and more systems. So if you are not familiar with how to write YAML files, learning this will pay off not only for writing docker-compose files. |
Let’s see the basic structure of the docker-compose file:
docker-compose.yml (schema)
version: "3"
services:
  traefik:
    [...]
  nextcloud:
    [...]
  mysql:
    [...]
  collabora:
[...]- line 1
-
Version
Specifies that we are using version 3 of the compose file syntax. (This is not the version of docker-compose or docker) - line 2
-
Definition of the services
Starts with the the services that we will use. Under this node all services are configured.
In the following we will have a deeper look into the configuration of each service. Some configurations directives like naming will be explained only once and not for every service, as this would be to verbose. However, due to this you should read through all the parts one by one.
4.3.2.1. Traefik
docker-compose.yml (Traefik part)
  traefik:
    image: ${TRAEFIK_IMAGES}
    command:
      - "--log.level=${TRAEFIK_LOG_LEVEL}"
      - "--providers.docker=true"
      - "--providers.docker.exposedbydefault=false"
      - "--entrypoints.websecure.address=:443"
      - "--certificatesresolvers.mytlschallenge.acme.tlschallenge=true"
      #- "--certificatesresolvers.mytlschallenge.acme.caserver=https://acme-staging-v02.api.letsencrypt.org/directory"
      - "--certificatesresolvers.mytlschallenge.acme.email=${ACME_MAIL}"
      - "--certificatesresolvers.mytlschallenge.acme.storage=/letsencrypt/acme.json"
    restart: always
    ports:
      - "443:443"
    volumes:
      - "${VOLUMES_LETSENCRYPT}:/letsencrypt"
      - "/var/run/docker.sock:/var/run/docker.sock:ro"
This part configures Traefik, which is our reverse_proxy, that forwards all incoming
requests to the other services (see architectural overview).
- line 1
-
Name
Sets the service-name to 'traefik'. As we do not specify a container name explicitly, docker-compose will generate this name: nextcloud_traefik_1. Compose will the take the name of the folder that contains the compose file, concatenates it with the name of the service and a number for that node(we will have only one noce per service, so this will be always 1) - line 2
-
Docker image
defines which docker image to get for traefik.
This is made configurable via a variable - lines 4-11
-
CLI parameters for Traefik
In short: the configuration of traefik is being grouped into static configuration (everything that changes rarely(are we working with docker, or kubernetes,…) and dynamic configuration for the stuff that changes more frequently.
For the static configuration traefik offers three ways:-
File based configuration
-
Environment variable configuration.
-
Command line parameter bases configuration (I choose to use this option)
-
- line 4
-
Debug log-level
This command-line parameter configured traefik to start in debug mode. This will increase the logging volume heavily. Use this when you have problems. This is commented out in this example. - line 5
-
Docker provider
This will setup traefik to use the docker-plugin, the provider. Essentially this, makes Traefik listen to every container that is started/stopped by Docker. Whenever a container starts, it checks if this container is being configured to used with Traefik. If so, it creates a route so that incoming traffic will be forworded to this service/container. It will also make sure that a valid ssl-certifcate is being used. - line 6
-
Docker expose by default
You explicitly have to enable containers to be handled by Traefik. - line 7
-
Entry points
Makes Traefik creating an endpoint named 'websecure' that listens on port 443. Traefik will use this endpoint to handle all incoming traffic and route it to the respective containers (see figure). - line 8-11
-
SSL-configuration
Configures how Traefik should manage certificates.
One variable is also made configurable. - line 12
-
Restart always
Makes Traefik always automatically restart, in case it crashes. - line 13 - 14
-
Ports
We will only expose (listing on that port on the docker-host) port 443. This is the default for HTTPS/SSL - line 15 - 17
-
-
The Letsencrypt volume is used to store the SSL-certificate related things'.
This is made configurable via a variable. -
Docker socket is someway special:
It enables the traefik container to connect to the mentioned socket on the docker-host. By connecting to this socket, Traefik is aware of all containers that are started and stopped. You will see later why this is important.
-
4.3.2.2. Nextcloud
docker-compose.yml (Nextcloud part)
  nextcloud:
    image: ${NEXTCLOUD_IMAGE}
    environment:
      - MYSQL_DATABASE=nextcloud
      - MYSQL_USER=nextcloud
      - MYSQL_HOST=mysql
      - MYSQL_PASSWORD
      - NEXTCLOUD_ADMIN_USER
      - NEXTCLOUD_ADMIN_PASSWORD
      - NEXTCLOUD_TRUSTED_DOMAINS
    restart: always
    volumes:
      - ${NEXTCLOUD_VOLUMES_CORE}:/var/www/html
      - ${NEXTCLOUD_VOLUMES_APPS}:/var/www/html/custom_apps
      - ${NEXTCLOUD_VOLUMES_DATA}:/var/www/html/data
      - ${NEXTCLOUD_VOLUMES_CONFIG}:/var/www/html/config
    labels:
      - "traefik.enable=true"
      - "traefik.http.routers.nextcloud.rule=Host(`${NEXTCLOUD_HOSTNAME}`)"
      - "traefik.http.routers.nextcloud.entrypoints=websecure"
      - "traefik.http.routers.nextcloud.tls.certresolver=mytlschallenge"
      - "traefik.http.middlewares.nextcloud.headers.customresponseheaders.Strict-Transport-Security=max-age=15552000; includeSubDomains"
    depends_on:
      - mysql
- traefik- line 3-16
-
Environment
We are passing two environment variables into the Nextcloud-container…-
the database name to be used to 'nextcloud'.
-
the database username to be used also to 'nextcloud'.
-
the hostname of the db, that we will connect to. Docker-compose, will create an internal network for all your services. In this network each service can find each other via it’s service name. Docker provide an DNS-server that resolves those names correct.
-
MYSQL_PASSWORD
that is password nextcloud will use to connect to the database. We are not providing here a value. This will make docker-compose lookup a value from an environment. In our case those values will come from the configuration file. -
NEXTCLOUD_ADMIN_USER
Nextcloud will be initialiased with an created user with this name. This user will have admin rights. -
NEXTCLOUD_ADMIN_PASSWORD
The password for the aforementioned user. -
NEXTCLOUD_TRUSTED_DOMAINS
the domain-name this installation feels responsible for (cloud.dancier.net)
-
- lines 12 - 16
-
Volumes
-
nextcloud-core, this will contain the core part of nextcloud
-
nextcloud-app, this will hold your installed apps (kind of extensions of nextcloud)
-
nextcloud-data, this very likely to be the volume that has to store most.
-
nextcloud-config, this will contain the configuration files the will be read by Nextcloud
-
- lines 12 - 17
-
Labels
-
traefik.enable
as I told you in the description of the Traefik-Service, Traefik will be informed by every start and stop of a docker container. I will also be able to read the labels associated with the containers. By reading this lable, we tell traefik to feel responsible to this service. -
Rule
This is also read by Traefik and tells it to forward all traffic that has the HTTP-host header set to the configurable value to this service. -
Entry point
Traefik will use this named endpoint (see configuration for Traefik) to consider traffic for Nextcloud -
Certresolver
Defines which certifcate-generation strategy should be used (we configured also this in the Traefik-part) -
Strict-Header Tried to circumvent an error message in the nextcloud backend
-
- lines 18 - 20
-
Depends on
-
Nextcloud needs to have traefik running before being started, as traefik would not be able to configure ssl when it starts after nextcloud
-
Nextcloud needs a running database, so we also wait until it is started.
-
4.3.2.3. MySQL
docker-compose.yml (MySQL part)
  mysql:
    image: ${MYSQL_IMAGE}
    command: --transaction-isolation=READ-COMMITTED --binlog-format=ROW
    volumes:
      - ${MYSQL_VOLUMES}:/var/lib/mysql
    environment:
      - MYSQL_ROOT_PASSWORD
      - MYSQL_PASSWORD
      - MYSQL_DATABASE=nextcloud
- MYSQL_USER=nextcloud- line 3
-
CLI-Parameter
-
Database Transaktion level set to
READ_COMIITTED -
Binlog set to row
This is prescribed in Nextcloud-Admin-Configuration
-
- lines 6 - 10
-
Environment
You, should notice that we configure four environment variables here. Two of them already with a concrete value-
MYSQL_DATABASE=nextcloud
-
MYSQL_USER=nextcloud
This, configures MYSQL to create a database named 'nextcloud' with a user of the same name, that has all rights on the database 'nextcloud'. The creation of the database happens only it does not already exist. The corresponding passwords are taken from the next two environment variables.
-
MYSQL_ROOT_PASSWORD
-
MYSQL_PASSWORD
They do not have any values. In such a case docker, compose will take them from a file named
.envin the current directory (this could also be overwritten by CLI parameters when invoking docker-compose, but in our case we do not care). In the configuration part, I will tell you how to set up this file.
-
4.3.2.4. Collabora
docker-compose.yml (Collabora part)
  collabora:
    image: ${COLLABORA_IMAGE}
    restart: always
    environment:
      - domain=${COLLABORA_DOMAIN}
      - DONT_GEN_SSL_CERT=YES
      - extra_params=--o:ssl.enable=false --o:ssl.termination=true
    depends_on:
      - traefik
    cap_add:
      - MKNOD
    labels:
      - "traefik.enable=true"
      - "traefik.http.routers.collabora.rule=Host(`${COLLABORA_HOST}`)"
      - "traefik.http.routers.collabora.entrypoints=websecure"
- "traefik.http.routers.collabora.tls.certresolver=mytlschallenge"- lines 4 - 6
-
Environment
-
domain, the DNS name of the Nextcloud installation
-
DONT_GEN_SSL_CERT, SSL certifcate management is handeled by Traefik
-
extra_params
-
as Traefik will terminate SSL (only HTTP reaches this service, not HTTPS), we disable ssl here
-
we indicate, that SSL was used, but terminated (likely used for link generation, i guess)
-
see this page on Collabora Onlline for more help.
-
- lines 9
-
Depends on
…Traefik for SSL-management. - lines 9-10
-
Adding capablities
MKNOD enables the collabora container to create devices nodes. This could be dangerous (link) Do we really need this. The Nextcloud documentation comes with examples, containing this directive, collabora comes without it. I will try in the future to run without it. If you successfully run collabora without this being set, please use the comments to tell me.
4.3.3. Maintaining the system with maintenance.sh
This script should cover all maintenance tasks for you while operating your Nextcloud installation.
Currently, only a simple backup functionality is being implemented. You should do a backup especially before every update.
We will explain the usage of this script after we had configured it.
4.4. Configuring the system
Now you should have at least an understanding, about the important files. You also have made sure, that the DNS names point to the correct IP-address.
Not we are making our fingers wet, change a file and start the system!
4.4.1. Creating and editing .env
You see in the root-directory of the project a file called .env-template. As the
name implies, this is only a template. Let’s create a nontemplate from this.
root@cloud:~/nextcloud# cp .env-template .envNow edit the file (I would suggest to use vim). You will have to adapt at least, the domain names to match your needs. I tried to use self explaining varibale names with additionally help of comments where I considered the name as not explaining enough.
(In case of questions, just use the comments under this howto. I will give my best to help you).
4.4.2. First start of the system
Now everything should be fine.
You have an .env file with updated values where it this was needed.
So give it a try and start the system!
# in the project folder
cd /root/nextcloud
docker-compose up
This first run will take some time. At an essence the following time-consuming things happen: * all docker image will be downloaded from docker (we have 4 services, so this is not few data) * the ssl certifcates will be created
You may have realized that the docker-compose command does not return to your terminal. If you
want to stop docker, than you have to type CTRL+C. (But do not stop it now! If you already
have stopped it, just restart with docker-compose up and continue reading.)
Later we will start docker compose in the background.
When you do not see any progress on the console, that you can safely assume that everything has been downloaded, and the SSL-certificates are in place.
Not open a browser and open https://cloud.dancier.net to intialize Nextcloud.
If you get an HTTP 502 (Bad Gateway), than you have not waited long enough. Just wait one or two minutes more.
Then you should get another error message ;-)
The reason is, that the default config will make Nextcloud generating redirect links to the HTTP Version (the non SSL/HTTPS) of the links. On this links, no service is being configured, so you will see an error page of the browser.
You have to change the config of Nextcloud to fix this. This will be explained in the next section.
4.4.3. Change config.php
You can stop the running docker-compose setup by typing CTRL + C.
Check which directories are now existing. You will see that docker compose has created one for each volume
that we have configured. And these folder are also not empty, they contain the mounted files
from the docker containers.
Edit the file ./nextcloud-config/config.php.
Make sure the following keys exist one time and have the following values (and use your brain to use your hostnames ;-)
'overwritehost' => 'cloud.dancier.net',
'overwriteprotocol' => 'https',
'overwrite.cli.url' => 'https://cloud.dancier.net',
Now if you open again https://cloud.dancier.net (really use the https) than you
should be able to login!
Login in with the values NEXTCLOUD_ADMIN_USER and NEXTCLOUD_ADMIN_PASSWORD from your .env file.
4.4.4. Install/Configure the collabora office plugin
Now you have a running collabora-office server. What is left out, is to install the appropiate plugin/app for Nextcloud.
-
First login into Nextcloud with your Browser
-
In to top right corner, open the
Appsmenu: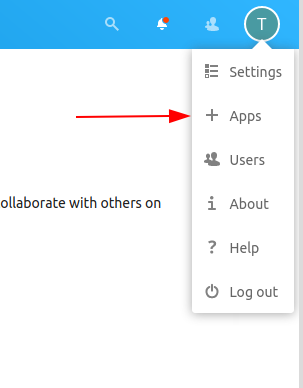
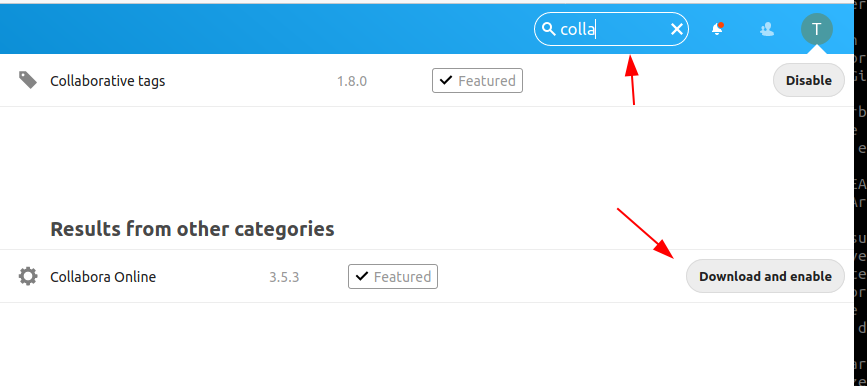
-
Type "colla" in the serach field and click on "Download and enable" on the appearing App-Entry:
-
Now you have to configure the installed App. Open the
Settingsfrom the top right corner: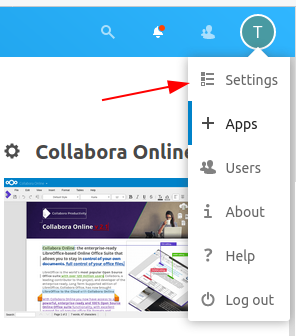
-
Select in
Administrationthe sub-itemCollabora Online: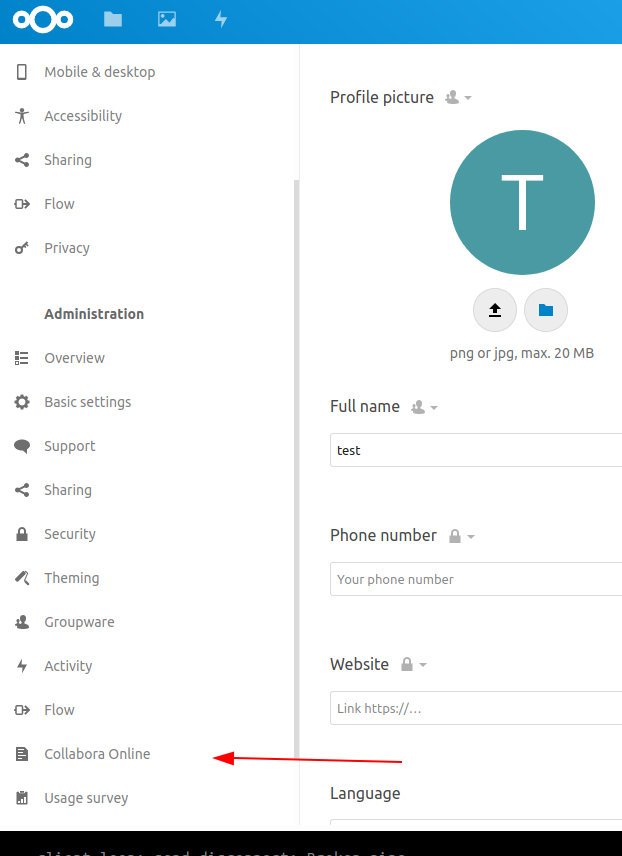
-
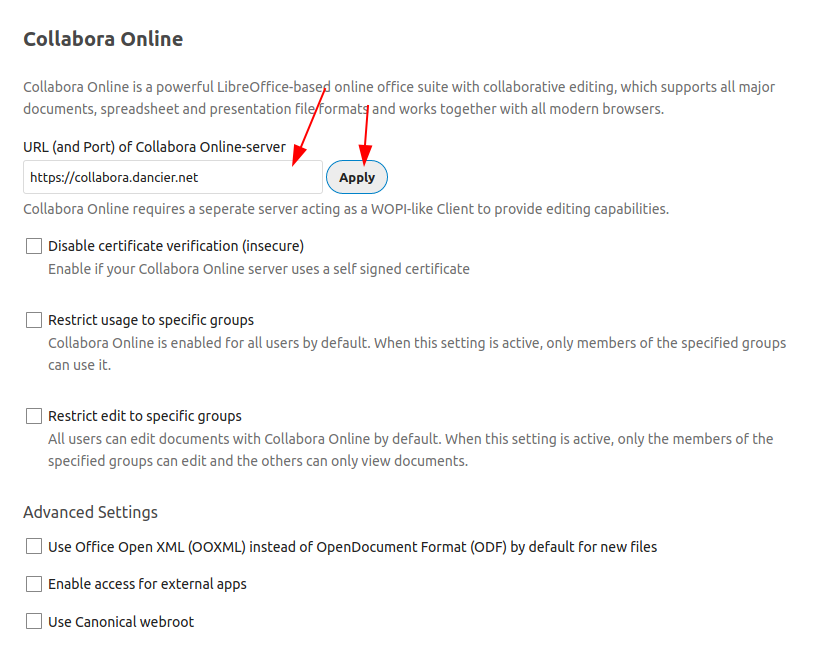
To configure the App, type in the URL to the collabora host, and click on apply.
-
Now , from the files Area from Nextcloud, open one of the example office documents, or just create a new one.
Now you are done. Enjoy it!
5. Summary
Let’s summarize what he have achieved:
-
We have an own Nextcloud installation running
-
Everything is reachable via valid SSL certificates
-
We can also sync with mobiles running Android/Mac
-
We have an office suite, that enable us to work wherever we are
-
We can also easily work together on the very same document at the very same time!
I hope you like this tutorial and recommend it! In case of question, or just for praise use the comments below.
6. Where to go next
In the next Howto I will explain:
Howto …
-
… perform updates
-
… do backups
-
… fix Problem in your Installation with synching your I-Phone